Simple Web Application Using Java, Spring Boot, Aerospike and Docker
In this tutorial we will build a simple web application using Java, Spring Boot, the Aerospike Database and Docker 🚀
Some of the information in this article is likely outdated, for the current documentation and usage examples please refer to Spring Data Aerospike.
You will execute 3 simple steps:
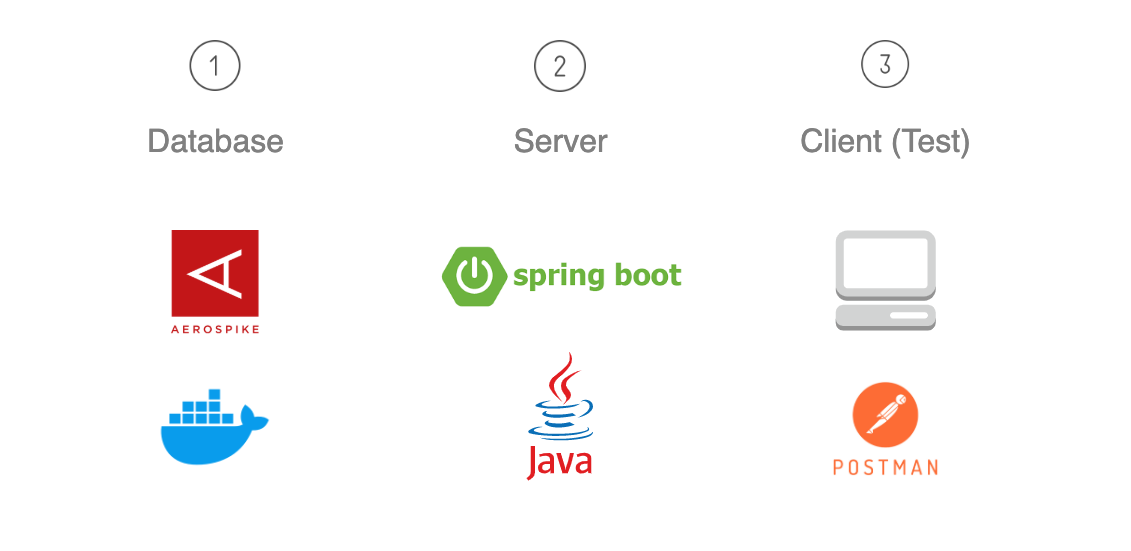
Database: In this step you will set up an Aerospike Database Docker container (recommended). Alternatively, you can also install the Aerospike Server manually on a virtual machine.
Server: You will create a simple web Java Spring Boot server.
Client (Test): You will use Postman to test the E2E flow by simulating the RESTful API requests and create, read and delete records from the Aerospike Database.
Source code for this demo can be found here: aerospike-examples/simple-springboot-aerospike-demo
Let’s Begin
1. Database:

Setting up Aerospike Database using Docker (Skip this part if you already have Aerospike container/would like to install Aerospike manually on a virtual machine)
The fastest and simplest way to use Aerospike Database is using Docker, you can alternatively use a virtual machine and install Aerospike Database manually.
1.1 Install docker
First you need to install docker on your local computer.
Download docker here:
https://docs.docker.com/engine/install/
Verify that docker is indeed installed by running:
$ docker --versionThe output should look similar to this:
Docker version 20.10.2, build 2291f61
1.2 Pull the Aerospike docker image
Once you installed docker, go to the following Aerospike docker image on docker hub:
https://hub.docker.com/r/aerospike/aerospike-server
You can follow the instructions in the above link for setting up Aerospike docker container, but for basic set up you can follow these instructions instead:
You can pull the docker image using the command:
$ docker pull aerospike/aerospike-serverVerify that you have Aerospike docker image by running:
$ docker imagesThe output should contain a row similar to this:
aerospike/aerospike-server latest 3dd11177eab8 11 days ago 195MB
You can also see it in the Docker GUI under “images” section:

1.3 Run the Aerospike Docker image
Run the docker image by running:
$ docker run --rm -tid --name aerospike-server -p 3000:3000 -p 3001:3001 -p 3002:3002 -p 3003:3003 aerospike/aerospike-serverAerospike docker container should be up and running, verify this by running:
$ docker psThe output should contain a row similar to this:
29629513efdf aerospike/aerospike-server “/usr/bin/dumb-init …” 45 seconds ago Up 44 seconds 0.0.0.0:3000–3003->3000–3003/tcp aerospike-server
You can also see it in the Docker GUI under “Containers / Apps” section:

2. Server:

2.1 Setup the project:
You can set up a Spring Boot project the way you’re familiar with, In this example we will use Spring Initializr (recommended).
Go to: https://start.spring.io/
a. At the left side of the screen you can configure your Spring Boot application:
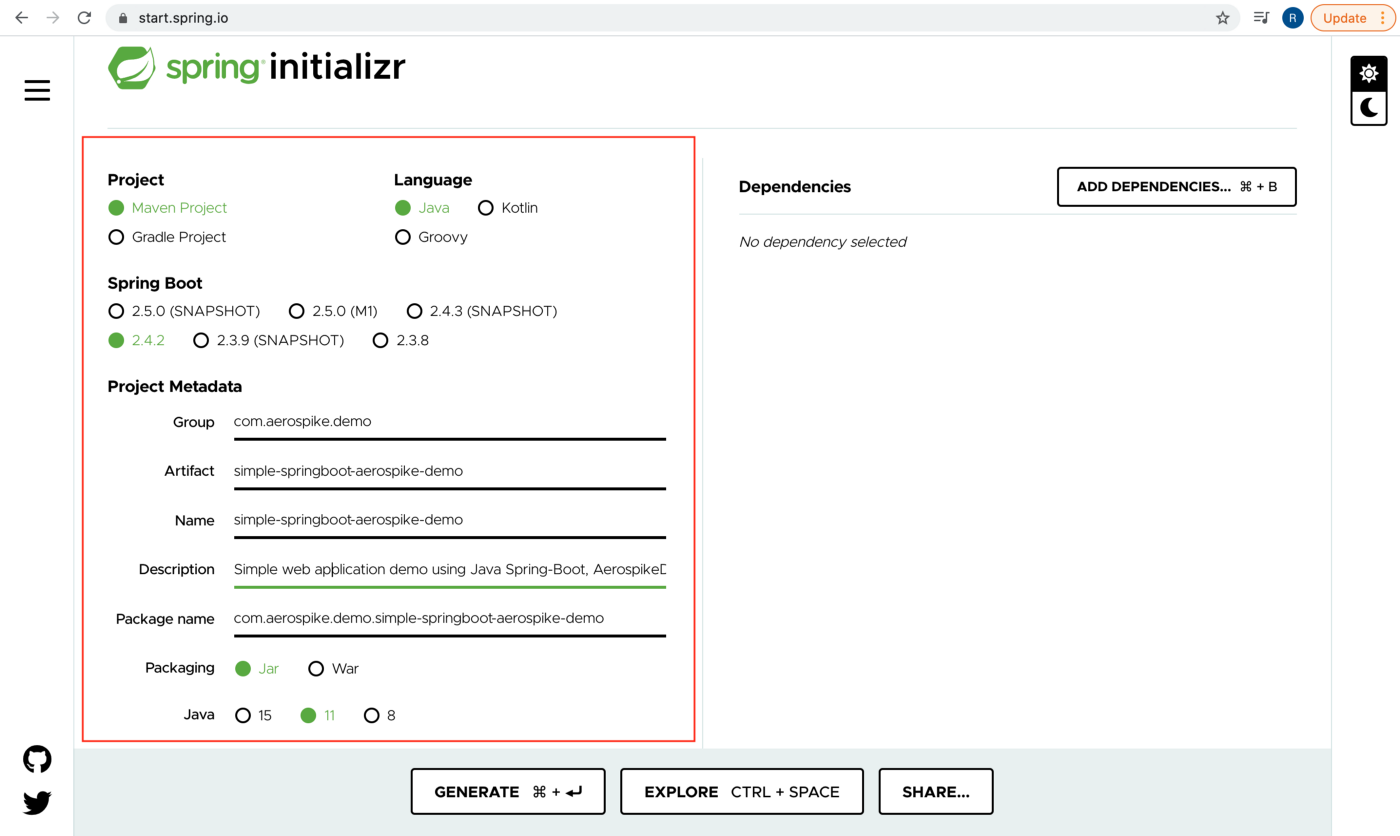
For this demo we will select:
Project: Maven Project
Language: Java
Spring Boot: 2.4.2
Packaging: Jar
Java: 11
*Select a name for the Group and Artifact.
b. At the right side of the screen add the following dependencies:
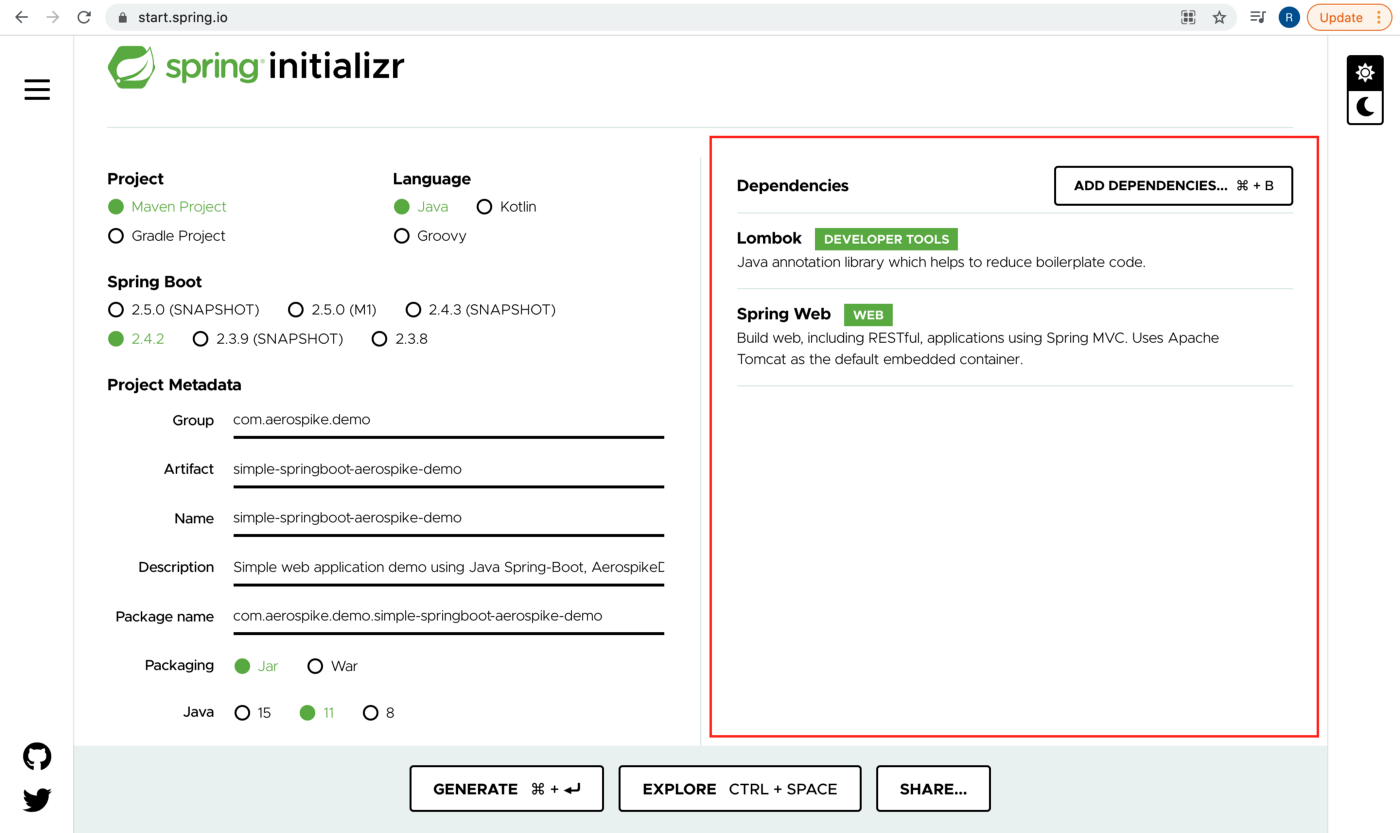
Lombok (library that provides annotations to help reduce boilerplate code).
Spring Web.
Once you done configuring the project and selecting the dependencies, select GENERATE at the bottom of the page, it will download a zip file to your local computer that contains all the necessary project files.
unzip the file in the directory you want to contain the project at.
In your IDE (we will use JetBrains IntelliJ IDEA in this demo), select File > Open > Select your unzipped directory and IntelliJ should recognize that its a Maven project.
2.2 Dependencies
We need to add spring-data-aerospike dependency.
Add the following dependency to the pom.xml file:
<dependency>
    <groupId>com.aerospike</groupId>
    <artifactId>spring-data-aerospike</artifactId>
    <version>2.4.0.RELEASE</version>
</dependency>
*Make sure to load maven changes after adding the dependency
After adding the aerospike dependency let’s review the project structure.
2.3 Project Structure
First, lets review how the final project structure should look like and explain each package responsibilities and then we will cover each class/interface code with more specific details (functionality, annotations…)
Final project structure:
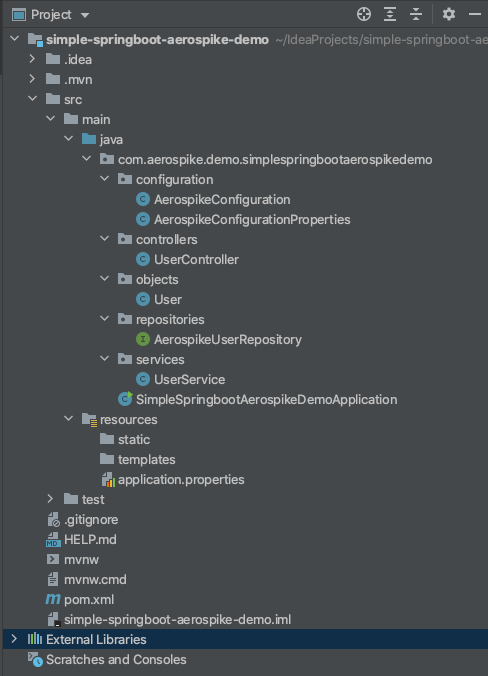
configuration: Configures our connection to Aerospike Database at the start of the Spring Boot application based on data such as host, port and namespace that we will provide in the application.properties.
controllers: Provides us a RESTful API that create, read and delete a user from Aerospike Database (in this demo we will show examples using Postman).
objects: Defines objects that will represent records in Aerospike Database. In this demo, we would use a simple “User” object.
repositories: In order to interact with Aerospike Spring Data we would need to create a repository that extends “AerospikeRepository” and providing the User object. Aerospike provides the implementation for most of the CRUD operations without the need to write any code. It will also “magically” allow us to use methods such as “findByBinName” without coding its implementation, but we would need to declare it in the interface. For more information about Spring Data repositories: https://docs.spring.io/spring-data/data-commons/docs/1.6.1.RELEASE/reference/html/repositories.html.
services: A basic service layer that will connect the UserController requests to the Aerospike Repository (if additional logic is required, this will be the place to add it).
2.4 Code
We will create the classes in the order of the project structure not the order of dependencies/execution, so if you are copying only some of the classes make sure that you have all the necessary code.
First add the following lines to the application.properties file:
# aerospike
aerospike.host=localhost
aerospike.port=3000
aerospike.namespace=test
Notes:
This will provide the basic configuration to interact with Aerospike database.
aerospike.port — “3000” is the default Aerospike port.
aerospike.namespace — “test” is the default namespace.
aerospike.host — defines a seed node for Aerospike database. The value “localhost” would work only if the Aerospike Database and the application are both running on the same localhost machine (in a docker container, for example). In this demo we assume that is the case. If you are running with a remote database, you would need to provide its remote seed node names/addresses.
Configuration:
Create a “configuration” package and under the new created package create the following classes:
AerospikeConfigurationProperties:
package com.aerospike.demo.simplespringbootaerospikedemo.configuration;import lombok.Data;
import org.springframework.boot.context.properties.ConfigurationProperties;
import org.springframework.stereotype.Component;@Data
@Component
@ConfigurationProperties(prefix = "aerospike")
public class AerospikeConfigurationProperties {
private String host;
private int port;
private String namespace;
}Notes:
AerospikeConfigurationProperties will define a configuration object that will contain the necessary properties in order to interact with Aerospike Database.
@Data — a Lombok annotation that will provide us getters & setters for all the properties in this class (to avoid boilerplate code).
@Component — Tells Spring to create a singleton bean of AerospikeConfigurationProperties.
@ConfigurationProperties — Reads the values of application.properties with the prefix “aerospike”.
AerospikeConfiguration:
package com.aerospike.demo.simplespringbootaerospikedemo.configuration;import com.aerospike.demo.simplespringbootaerospikedemo.repositories.AerospikeUserRepository;
import com.aerospike.client.Host;
import org.springframework.beans.factory.annotation.Autowired;
import org.springframework.boot.context.properties.EnableConfigurationProperties;
import org.springframework.context.annotation.Configuration;
import org.springframework.data.aerospike.config.AbstractAerospikeDataConfiguration;
import org.springframework.data.aerospike.repository.config.EnableAerospikeRepositories;import java.util.Collection;
import java.util.Collections;@Configuration
@EnableConfigurationProperties(AerospikeConfigurationProperties.class)
@EnableAerospikeRepositories(basePackageClasses = AerospikeUserRepository.class)
public class AerospikeConfiguration extends AbstractAerospikeDataConfiguration {
@Autowired
private AerospikeConfigurationProperties aerospikeConfigurationProperties; @Override
protected Collection<Host> getHosts() {
return Collections.singleton(new Host(aerospikeConfigurationProperties.getHost(), aerospikeConfigurationProperties.getPort()));
} @Override
protected String nameSpace() {
return aerospikeConfigurationProperties.getNamespace();
}
}Notes:
AerospikeConfiguration will create the beans that will hold the configuration properties that enables to interact with the Aerospike database (it uses the AerospikeConfigurationProperties object).
@Configuration — Indicates that a class declares @Bean methods, this will create the beans that are responsible of interacting with the Aerospike database.
@EnableConfigurationProperties — Enables support for @ConfigurationProperties annotated classes.
@EnableAerospikeRepositories — Activates AerospikeRepositories (without specifying the AerospikeUserRepository spring will scan for spring-data repositories.
Controllers:
Create a “controllers” package and under the new created package create the class:
UserController:
package com.aerospike.demo.simplespringbootaerospikedemo.controllers;import com.aerospike.demo.simplespringbootaerospikedemo.objects.User;
import com.aerospike.demo.simplespringbootaerospikedemo.services.UserService;
import lombok.AllArgsConstructor;
import org.springframework.web.bind.annotation.*;import java.util.Optional;@RestController
@AllArgsConstructor
public class UserController { UserService userService; @GetMapping("/users/{id}")
public Optional<User> readUserById(@PathVariable("id") Integer id) {
return userService.readUserById(id);
} @PostMapping("/users")
public void addUser(@RequestBody User user) {
userService.addUser(user);
} @DeleteMapping("/users/{id}")
public void deleteUserById(@PathVariable("id") Integer id) {
userService.removeUserById(id);
}
}Notes:
UserController will provide a RESTful API that we will later show examples of simulating client requests that will create, read and delete users from Aerospike Database using Postman.
@RestController — A convenience annotation that is itself annotated with @Controller and @ResponseBody. This annotation is applied to a class to mark it as a request handler.
@AllArgsConstructor — a Lombok annotation that generates a constructor with 1 parameter for each field in your class.
@PostMapping — Mapping HTTP POST requests into specific handler methods.
@RequestBody — Mapping HttpRequest body into a transfer or domain object, enabling automatic deserialization of the inbound HttpRequest body into a Java object.
Objects:
Create an “objects” package and under the new created package create the class:
User:
package com.aerospike.demo.simplespringbootaerospikedemo.objects;import lombok.AllArgsConstructor;
import lombok.Data;
import org.springframework.data.aerospike.mapping.Document;
import org.springframework.data.annotation.Id;@Data
@Document
@AllArgsConstructor
public class User {
@Id
private int id;
private String name;
private String email;
private int age;
}Notes:
User is an object that will represent a record in the Aerospike Database (id will be the Primary Key (PK) and name, email and age will be stored as bins).
@Data — a Lombok annotation that will provide us getters & setters for all the properties in this class (to avoid boilerplate code).
@Document — Identifies a domain object to be persisted to Aerospike.
@AllArgsConstructor — a Lombok annotation that generates a constructor with 1 parameter for each field in your class.
@Id — Will mark the field “id” as the Primary Key (PK).
Repositories:
Create a “repositories” package and under the new created package create the interface:
AerospikeUserRepository:
package com.aerospike.demo.simplespringbootaerospikedemo.repositories;import com.aerospike.demo.simplespringbootaerospikedemo.objects.User;
import org.springframework.data.aerospike.repository.AerospikeRepository;public interface AerospikeUserRepository extends AerospikeRepository<User, Object> {
}Notes:
AerospikeUserRepository extends “AerospikeRepository” (providing the User object), Aerospike provides an implementation for most CRUD operations so you wont need to write any code, it will also “magically” allow us to use methods such as “findByBinName” without actually writing the implementation (only the declaration in the interface). for more information about Spring Data repositories: https://docs.spring.io/spring-data/data-commons/docs/1.6.1.RELEASE/reference/html/repositories.html).
Services:
Create a “services” package and under the new created package create the class:
UserService:
package com.aerospike.demo.simplespringbootaerospikedemo.services;import com.aerospike.demo.simplespringbootaerospikedemo.objects.User;
import com.aerospike.demo.simplespringbootaerospikedemo.repositories.AerospikeUserRepository;
import lombok.AllArgsConstructor;
import org.springframework.stereotype.Service;import java.util.Optional;@Service
@AllArgsConstructor
public class UserService { AerospikeUserRepository aerospikeUserRepository; public Optional<User> readUserById(int id) {
return aerospikeUserRepository.findById(id);
} public void addUser(User user) {
aerospikeUserRepository.save(user);
} public void removeUserById(int id) {
aerospikeUserRepository.deleteById(id);
}
}Notes:
UserService will act as the service layer between the UserController and the AerospikeUserRepository, any business logic you would like to add — this is probably the place.
@Service — Tells Spring to create a singleton bean of UserService (same as @Component only marks the class as “Service” for better code readability).
@AllArgsConstructor — a Lombok annotation that generates a constructor with 1 parameter for each field in your class.
3. Client (Test):

3.1 Run the application
Let’s run the application by running the main method in the IDE (we are using IntelliJ IDEA in this demo).
Make sure your application is up and running and there weren’t any errors during application startup.
3.2 Adding a user using Postman
We will use Postman in order to simulate an addUser request that will save a user record in the Aerospike database.
If you don’t have Postman installed on your local computer you can download it here: https://www.postman.com/downloads/
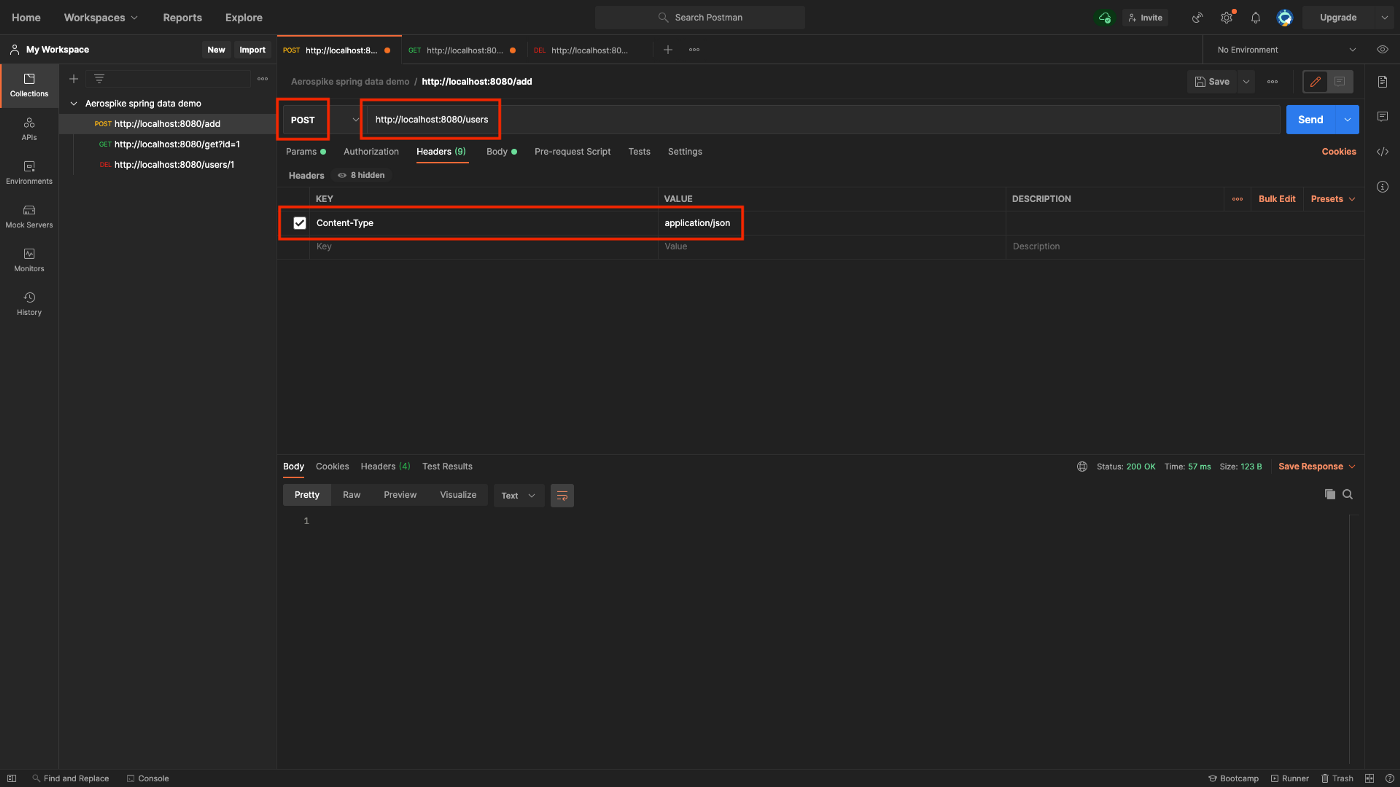
a. Create a new POST request with the following url: http://localhost:8080/users
b. Add a new key-value header in the Headers section:
Key: Content-Type
Value: application/json
c. Add a Body in a valid JSON format:
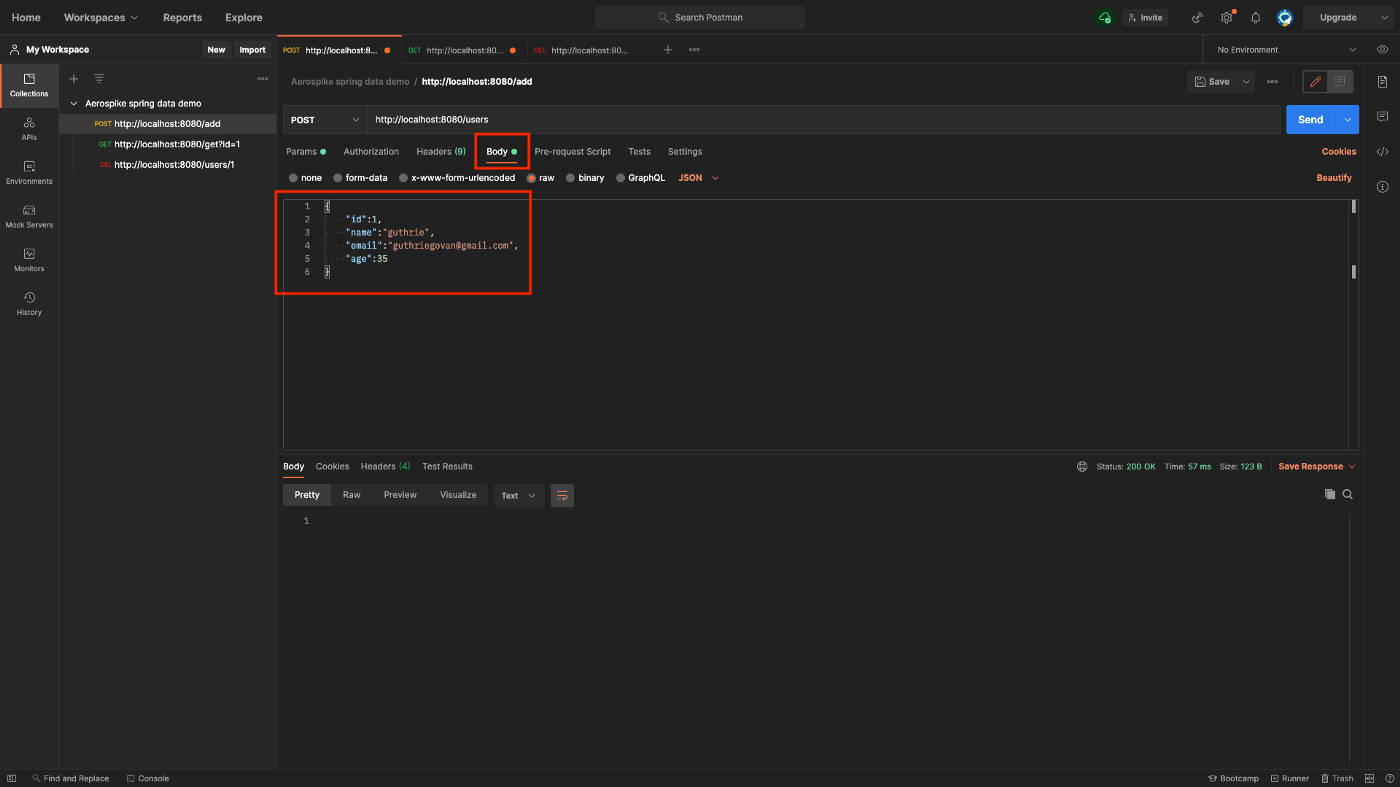
You can copy this example:
{
    "id":1,
    "name":"guthrie",
    "email":"guthriegovan@gmail.com",
    "age":35
}
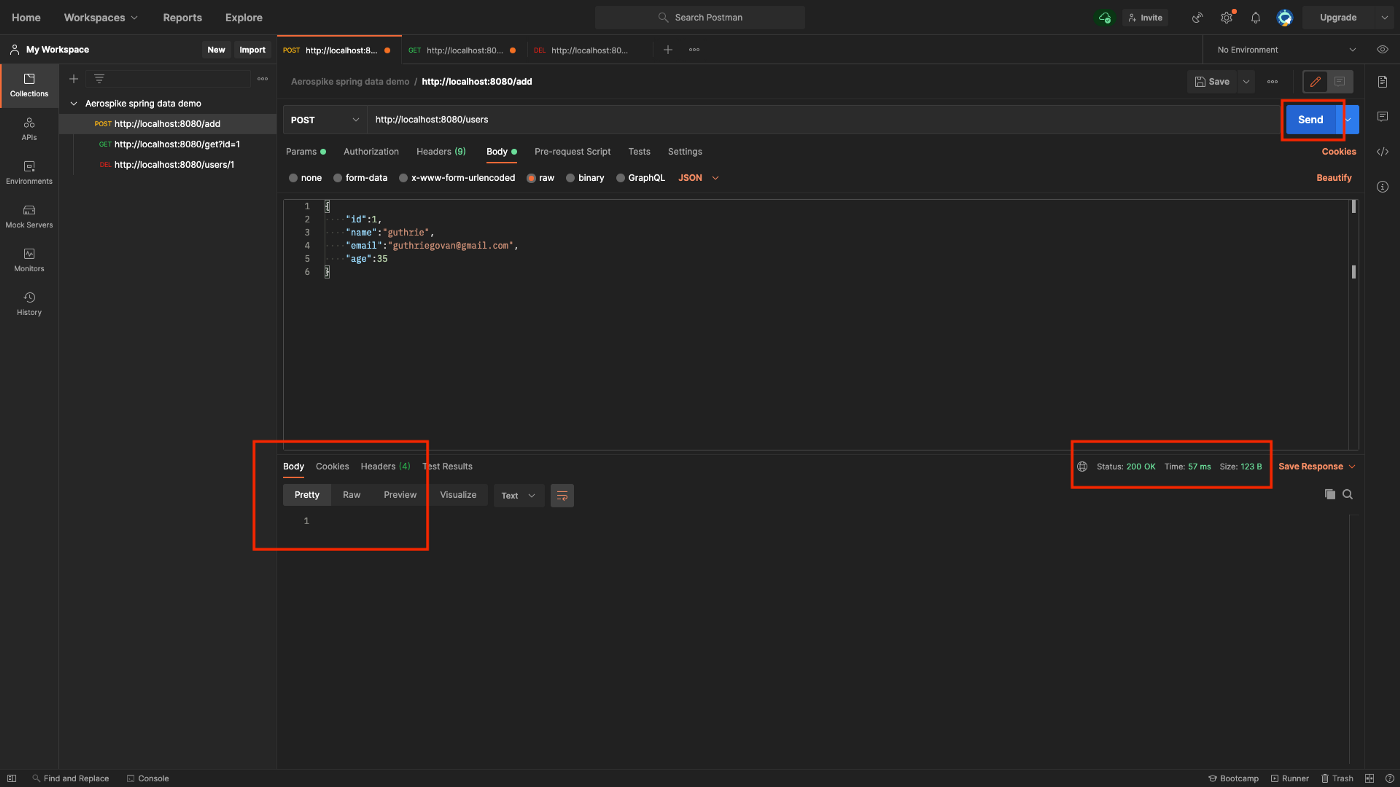
d. Press “Send” (and a success indication should be same as below):
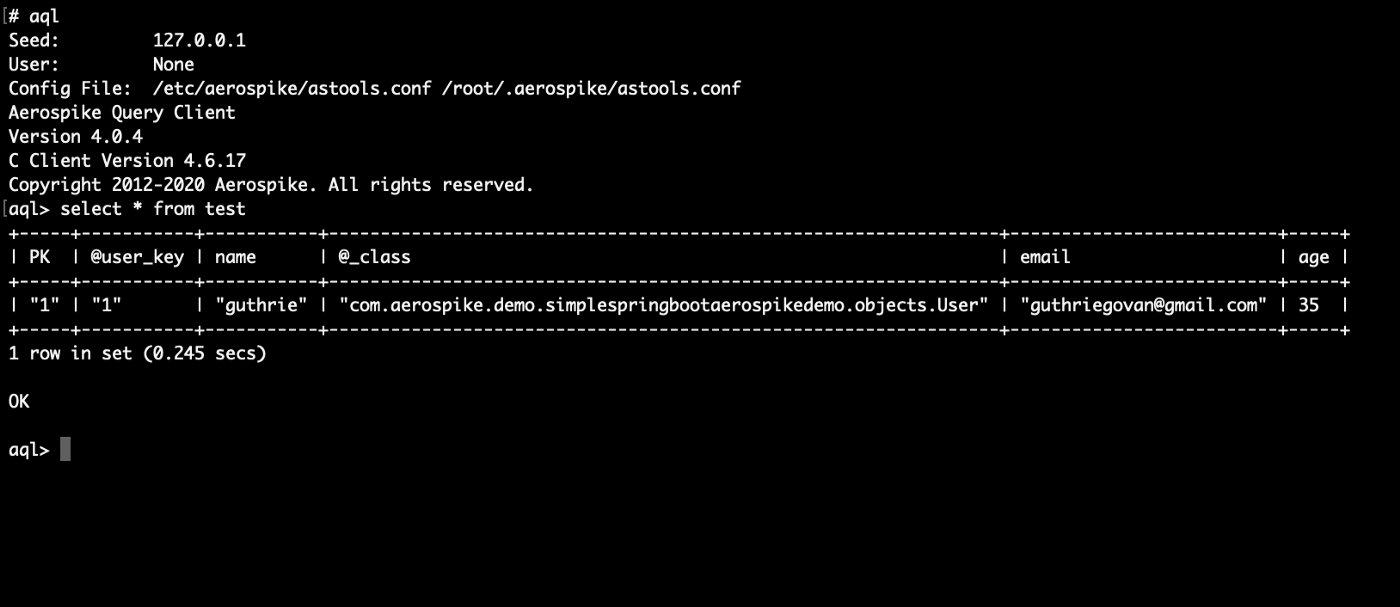
e. See the results using AQL (optional)
We can use AQL (a command line data browser) to see that the record is actually stored in the database.
Connect to the Aerospike container using Docker GUI/SSH, we will use Docker GUI:
Go to Containers / Apps > aerospike > select “CLI” on the right menu.
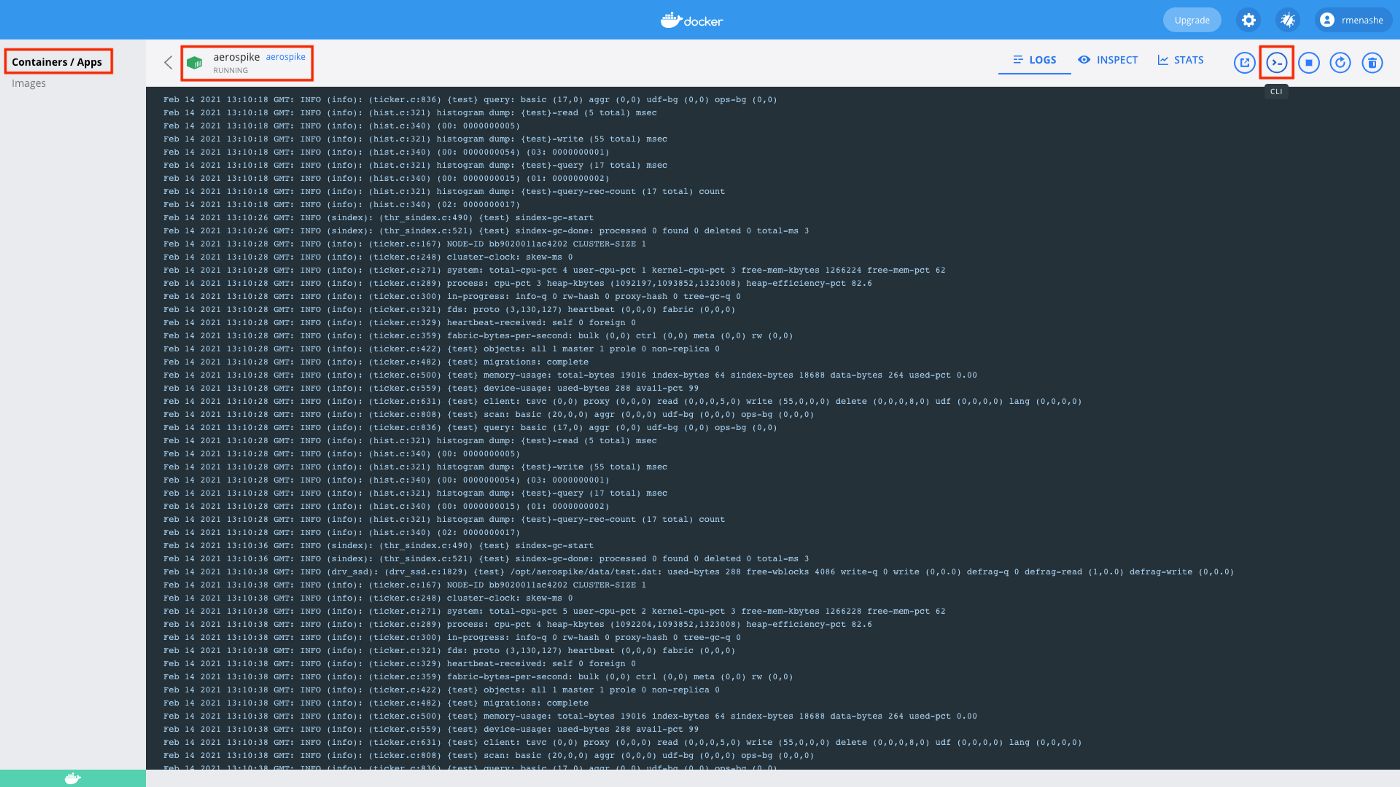
In the CLI, type “aql” and enter, it will open the “aql” interface.
Run “select * from test” and see that the record is stored in the Aerospike database.
3.3 Reading a user using Postman
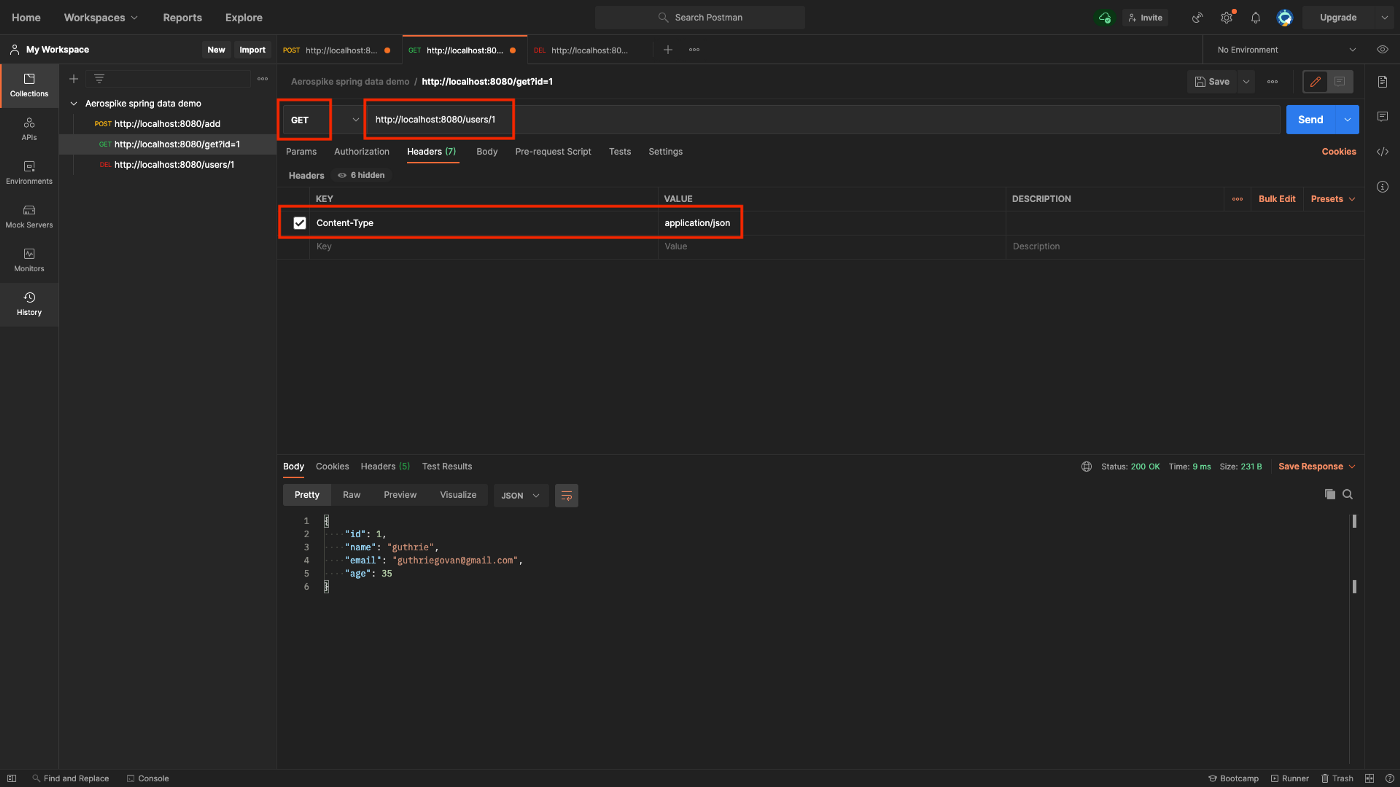
a. Create a new GET request with the following url: http://localhost:8080/users/1
b. If its not already exists, add a new key-value header in the Headers section:
Key: Content-Type
Value: application/json
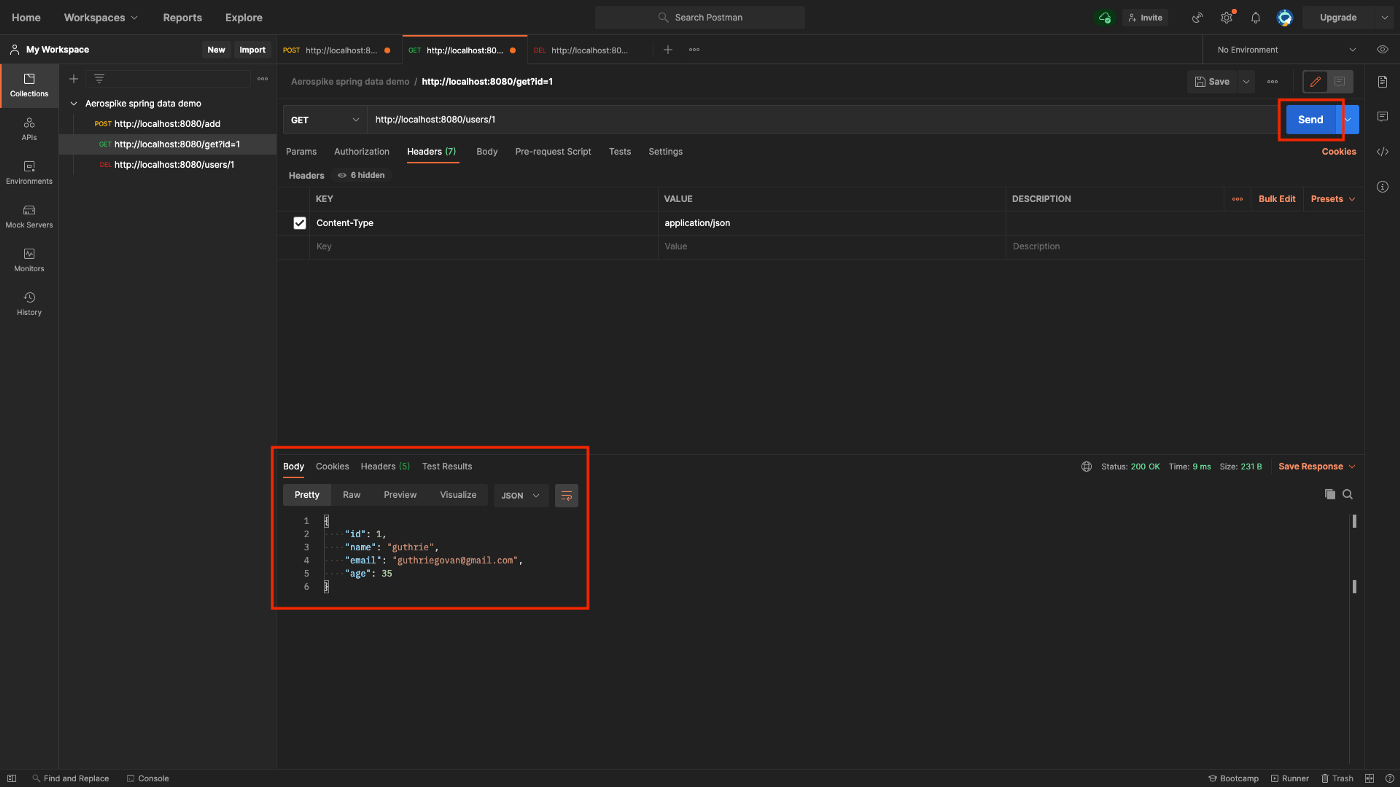
c. Press “Send” and see the user’s data:
3.4 Deleting a user using Postman
a. Create a new DELETE request with the following url: http://localhost:8080/users/1
b. If its not already exists, add a new key-value header in the Headers section:
Key: Content-Type
Value: application/json
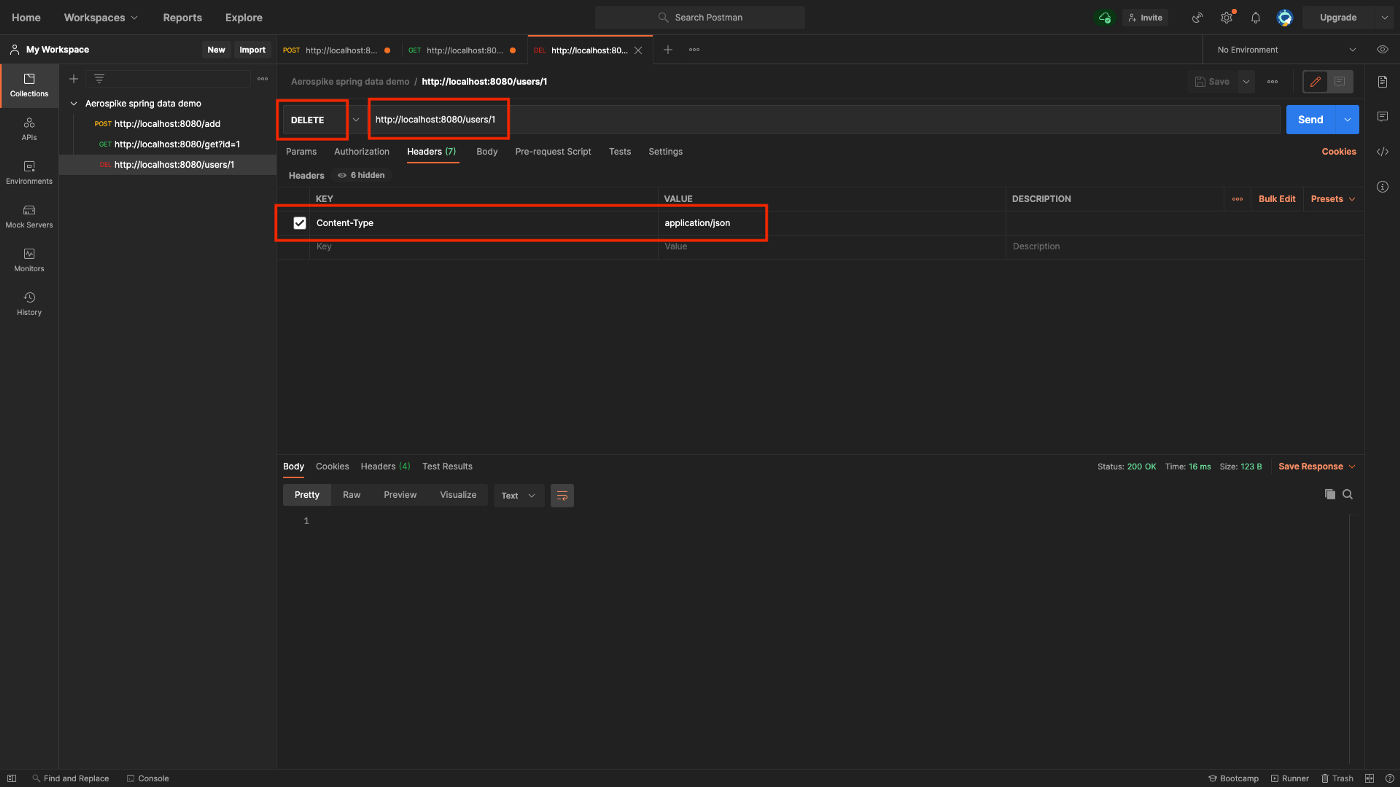
c. Press “Send” (and a success indication should be same as below):
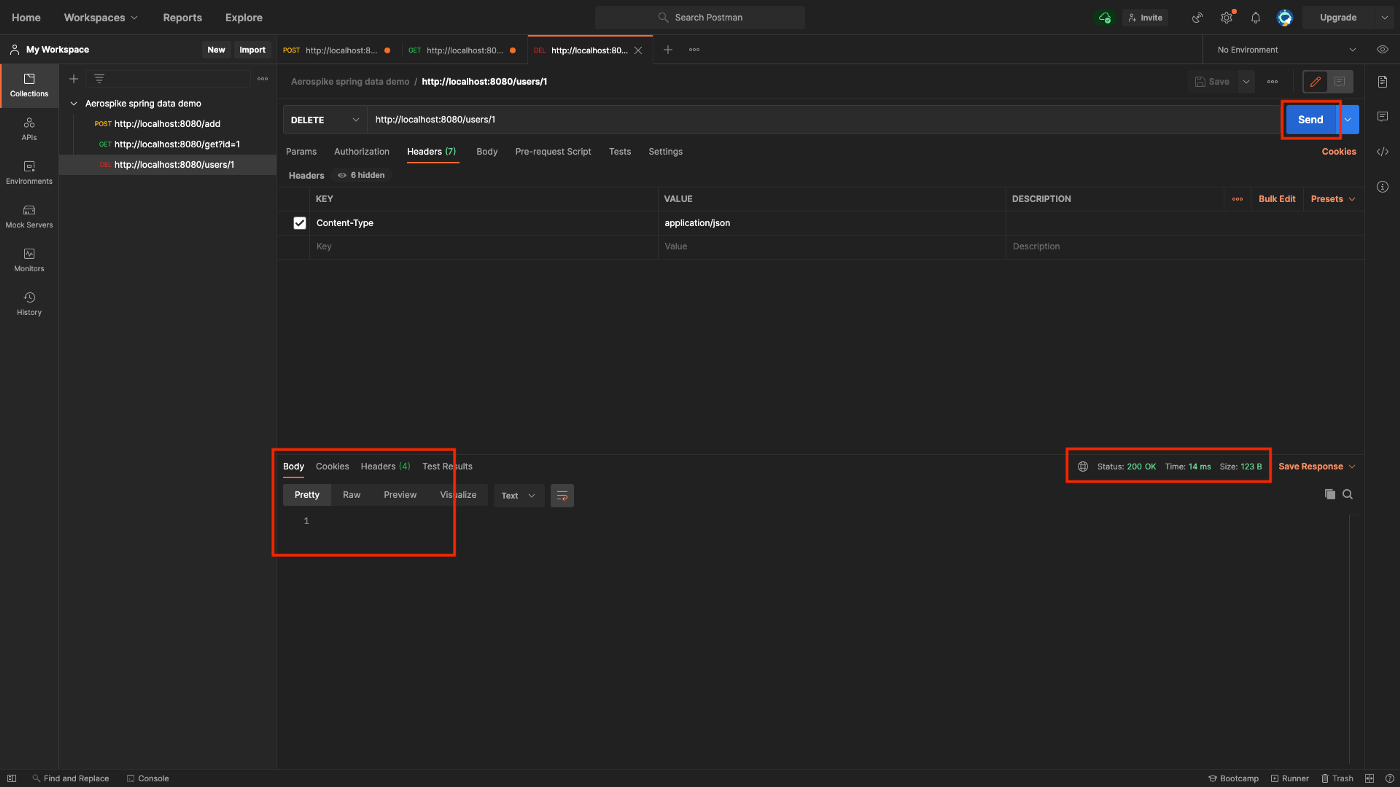
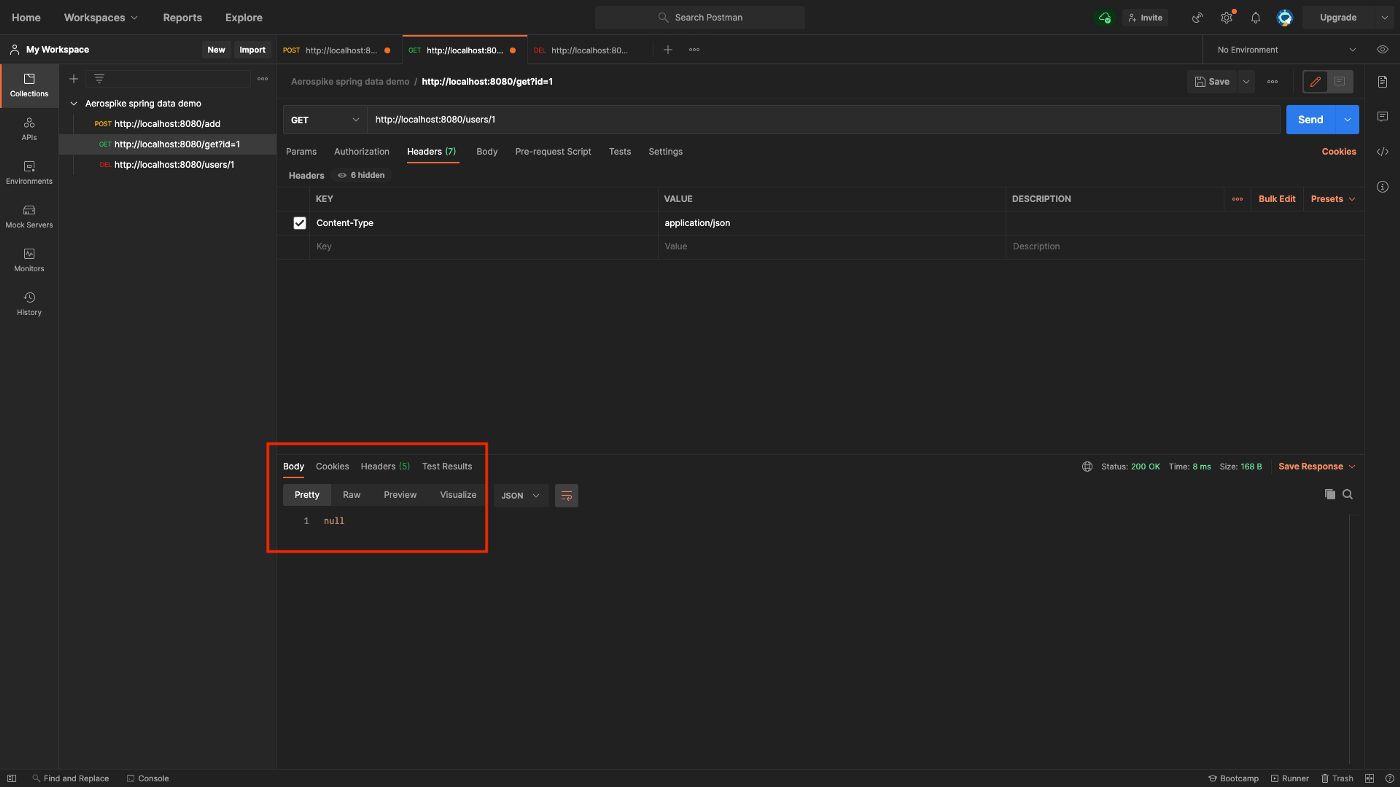
d. You can verify that the record is deleted (does not exist in the Aerospike Database) by calling another get request with the same id or using AQL, here is a get request result after a deletion (null):
Conclusion
This was a demonstration of how easy it is to build a simple Java Spring Boot application using Aerospike database as a data store.
There is much more you can do with Aerospike, you are welcome to take a look at Aerospike documentation and find out yourself:


