Introduction to Aerospike using Community Edition and AeroLab
Learn how to get started with Aerospike using Aerospike Community Edition (CE) and AeroLab. Discover the benefits of CE, hardware considerations, and how to use Podman as a virtualization platform for optimal performance.

So you have a project which requires database access with any combination of the following requirements:
Very low latency
High throughput
The ability to scale the data volumes almost without limit
Very high reliability
You do your research and find a plethora of databases out there, many of which will meet some of your requirements and others that claim to be able to meet all of these requirements. Aerospike is on that list and sounds promising. There are blogs explaining how it works in technical detail rather than just hand-wavy “trust us it’s fast” style statements. It sounds interesting and you would like to try it out. But how do you get started?
Getting started
Aerospike Community Edition (CE) is a free, open source version of Aerospike that is easy to install and get started on. This is a good choice if you want to try out Aerospike – it features exactly the same storage engine as the commercial product so you can test out speed, resiliency, throughput, and so on in a multi-node cluster without requiring any form of license. There are limitations to CE such as a limit of 8 nodes and 5TiB of data, but these are certainly enough to try out many use cases. A full comparison of CE against the commercial versions of Aerospike can be found here.
You will need to decide what hardware you want to run the database on. To get the best performance out of Aerospike you would typically run it on multiple Linux machines, each with SSDs on them. These can be on bare metal machines, cloud instances with attached SSDs, or in virtualized environments such as VMware or Docker. The first step most people take is using a virtualization environment to run multiple instances on a single machine just to try things out. Once they have confidence that it will work for their use case they then go to the effort of using multiple machines.
This blog will assume you want to go down that route and will show how to use Podman as the virtualization platform. Podman can be configured as a drop-in replacement for Docker, has a nice user interface with Podman Desktop, and can run on Macs, Windows, and Linux. Unlike Docker Desktop, Podman and Podman Desktop are 100% free and open source, so there are no license issues to worry about.
To install Podman Desktop follow these instructions for your desired operating system. Once you launch the software you will probably be prompted to install the Podman engine which you need to do.
While you’re in the user interface, you will want to enable Docker compatibility mode. This feature allows you to use Docker commands and have them processed by Podman. To do this, go to Settings in Podman Desktop (cog icon in the lower left of the window) then select Preferences and scroll down to “Docker Compatibility” under Extension: Podman on the right, or type “Docker” in the Preference search bar. Enable this setting then restart Podman Desktop. You should notice that “Docker Compatibility” now appears in the lower-left corner of the screen.

You will need to install the Docker Command Line Interface (docker-cli) to use docker commands. On a Mac, this can be done with HomeBrew using
brew install dockerOn other platforms you may need to install Docker Desktop to get access to the docker-cli. Currently, using the docker-cli with Podman running the containers is permissible with the Docker Desktop license without a commercial license.
Installing the Aerospike Database container
Once you've installed Podman and the Docker CLI, use them to pull down the latest copy of the Aerospike Database and install it. The easiest way to do this is to download CE for various operating systems, including showing the docker command to pull down the latest CE version.
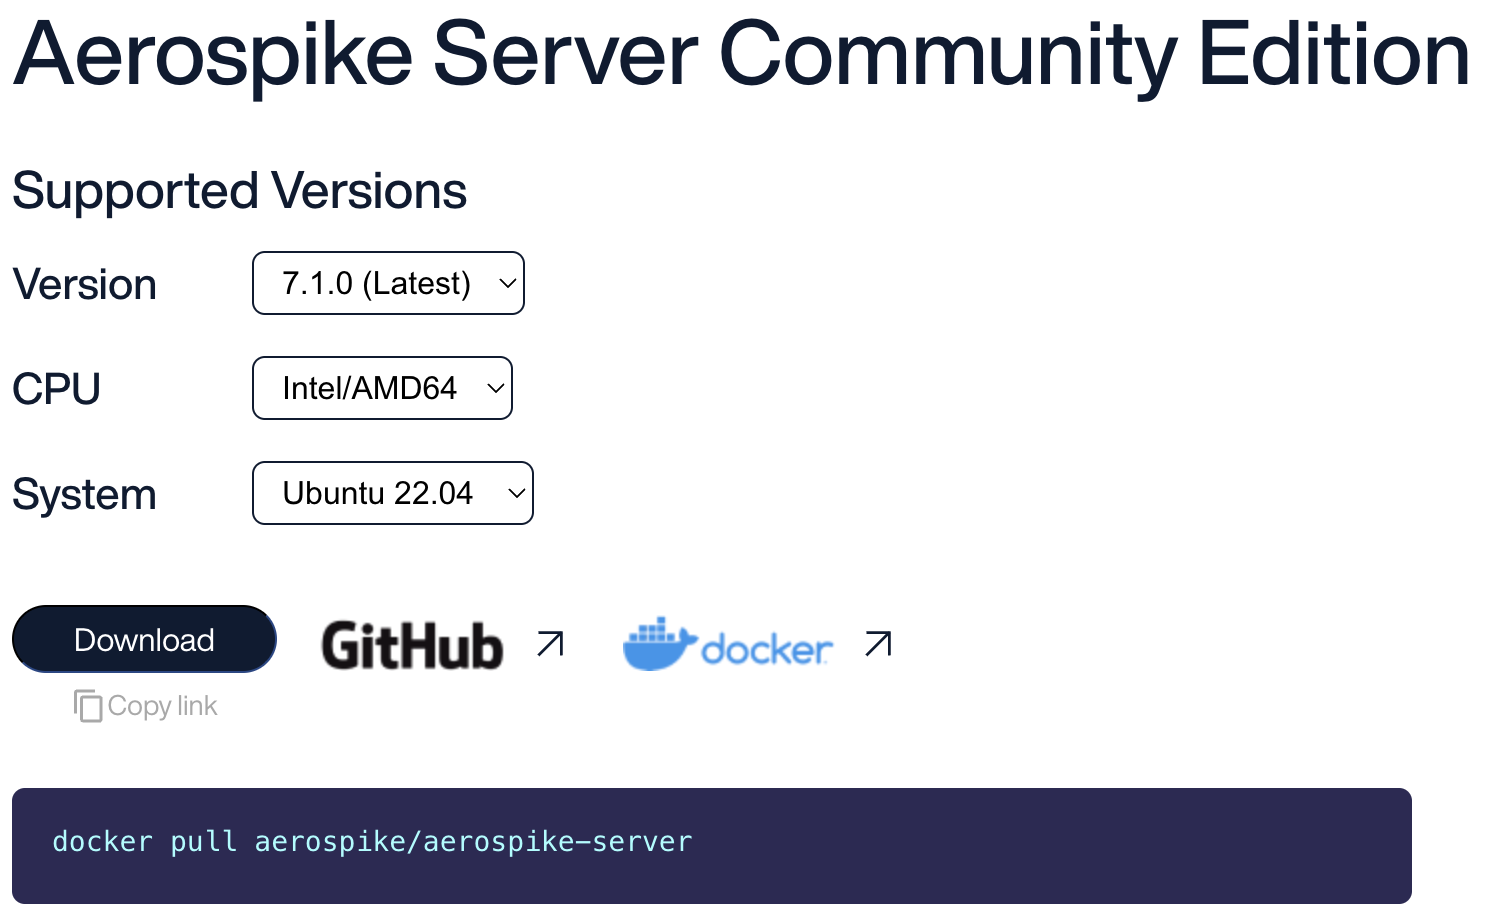
To get the latest Docker image and start the Aerospike server:
% docker run -tid --name aerospike -p 3000-3002:3000-3002 aerospike/aerospike-serverThis will pull down the latest version of the Aerospike Database and start up a container. To ensure this ran successfully, execute:
% docker psThis should display something similar to the following:
CONTAINER ID   IMAGE                        COMMAND                  CREATED         STATUS         PORTS                                                           NAMES
979765d925df   aerospike/aerospike-server   "/usr/bin/as-tini-st…"   2 minutes ago   Up 2 minutes   0.0.0.0:3000-3002->3000-3002/tcp, :::3000-3002->3000-3002/tcp   aerospike
If you look in your Podman Desktop, you should also be able to see the container aerospike running.
Installing tools
On a Mac, running the tools locally eliminates the need to run every command through docker exec, making the commands simpler. The download page allows you to download the tools natively with an intuitive user interface.
In the “System” dropdown, select “macOS” and make sure the CPU dropdown is appropriate for your Mac – either Intel/AMD64 for Intel-based Macs or ARM64 for Macs based on the “M” series of processors.
Once this download is complete, run the binary to be guided through the installation process. You can validate that the installation was successful by launching a terminal window and executing:
% asinfo -v build
7.1.0.2
Note that your output may be different based on which version you installed, but so long as you get a version returned, the install was successful.
Unfortunately, the Aerospike tools do not run natively on Windows, so the best option for Windows users is to run them through the containers. The Aerospike container you started already has the tools installed.
Before moving on, stop and remove the Aerospike Docker container with:
% docker stop aerospike
% docker rm aerospike
This will allow you to use an easier deployment mechanism – AeroLab!
Deployments made simple with AeroLab
If you’re running in a virtualized environment like Docker/Podman or cloud environments like AWS or GCP, the open source tool AeroLab can simplify deployments of different Aerospike environments.
Installing and configuring AeroLab
Navigate to GitHub, select the desired release (normally the latest), find your operating system under Assets, and then download and install the image.
Once AeroLab is installed on your system, the first thing to do is to tell it which backend to use. If you’re using Podman for example, you would use the following command.
aerolab config backend -t dockerAeroLab features context-sensitive help, so if you get stuck at any point, just put the word help after what you want to know. So, for example, if you knew you wanted to configure the backend but didn’t know the options you could enter:
aerolab config backend helpUsing AeroLab
Once you have configured AeroLab you can use it to create a cluster. For example, to create a 5-node CE cluster with version 7.1.0 you would execute:
aerolab cluster create -v 7.1.0c -c 5 -n ceThis command will find the correct version of Aerospike CE from the public releases (-v 7.1.0c), download the image, and create 5 containers (-c 5) based on this image with the cluster name of “ce” (-n ce). It will configure all the nodes to form a cluster and start Aerospike. Doing the same in native Podman containers would require a substantial level of effort! If you look in your Podman Desktop window or do docker ps at a command prompt, you should find multiple processes:
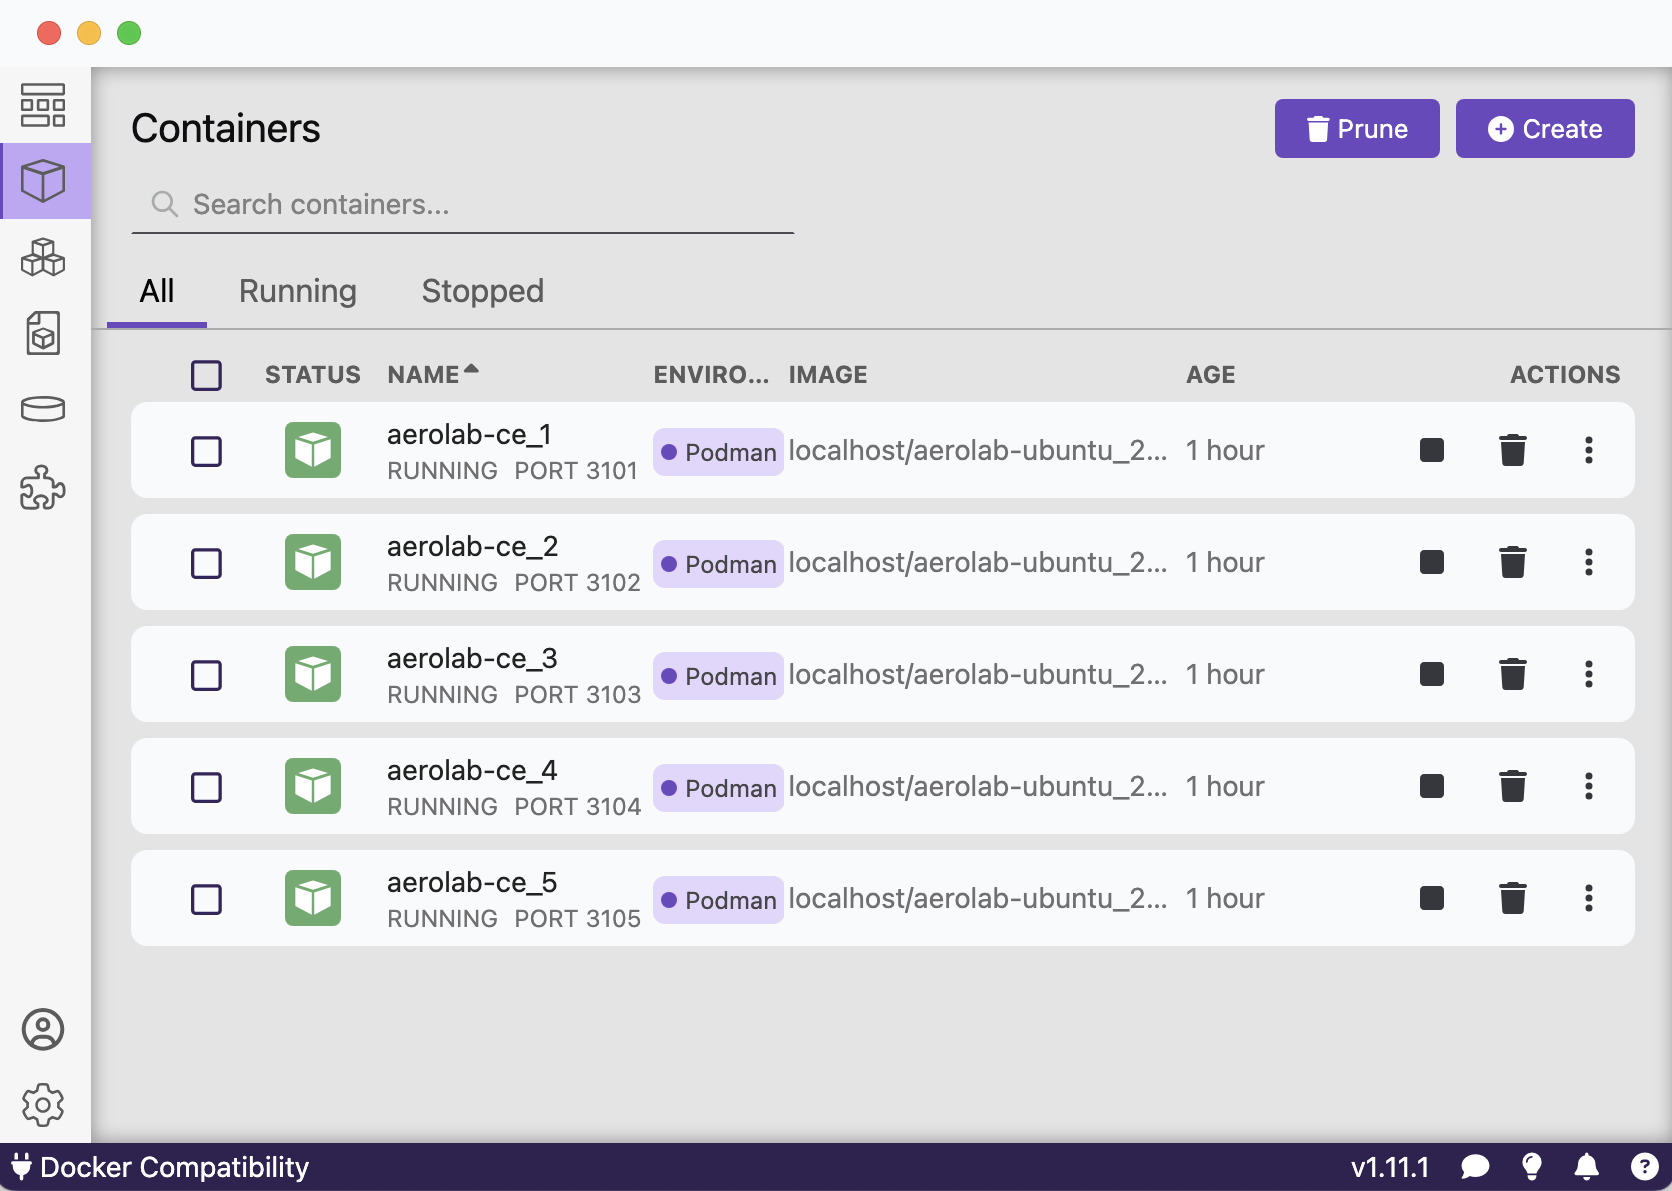
To view the cluster in AeroLab you can run:
aerolab cluster listThis will show similar information to the view in Podman above. Note that all the nodes expose a port which is how you can communicate with the cluster nodes.
Monitoring the cluster
Aerospike supports a monitoring stack using Prometheus and Grafana. There are several things that have to happen to get a cluster to be monitored:
Each node in the cluster needs an exporter on it which scrapes the metrics off the server in a format Prometheus understands
Prometheus and Grafana have to be installed
Prometheus needs to be configured to talk to the exporters on each node
Grafana needs to be configured with the latest dashboards and to talk to Prometheus.
Of course, AeroLab makes this easy!
To install the exporter on each node (step 1) simply execute:
aerolab cluster add exporter -n ceThis will take a few moments but should complete successfully. To complete all the other steps just do:
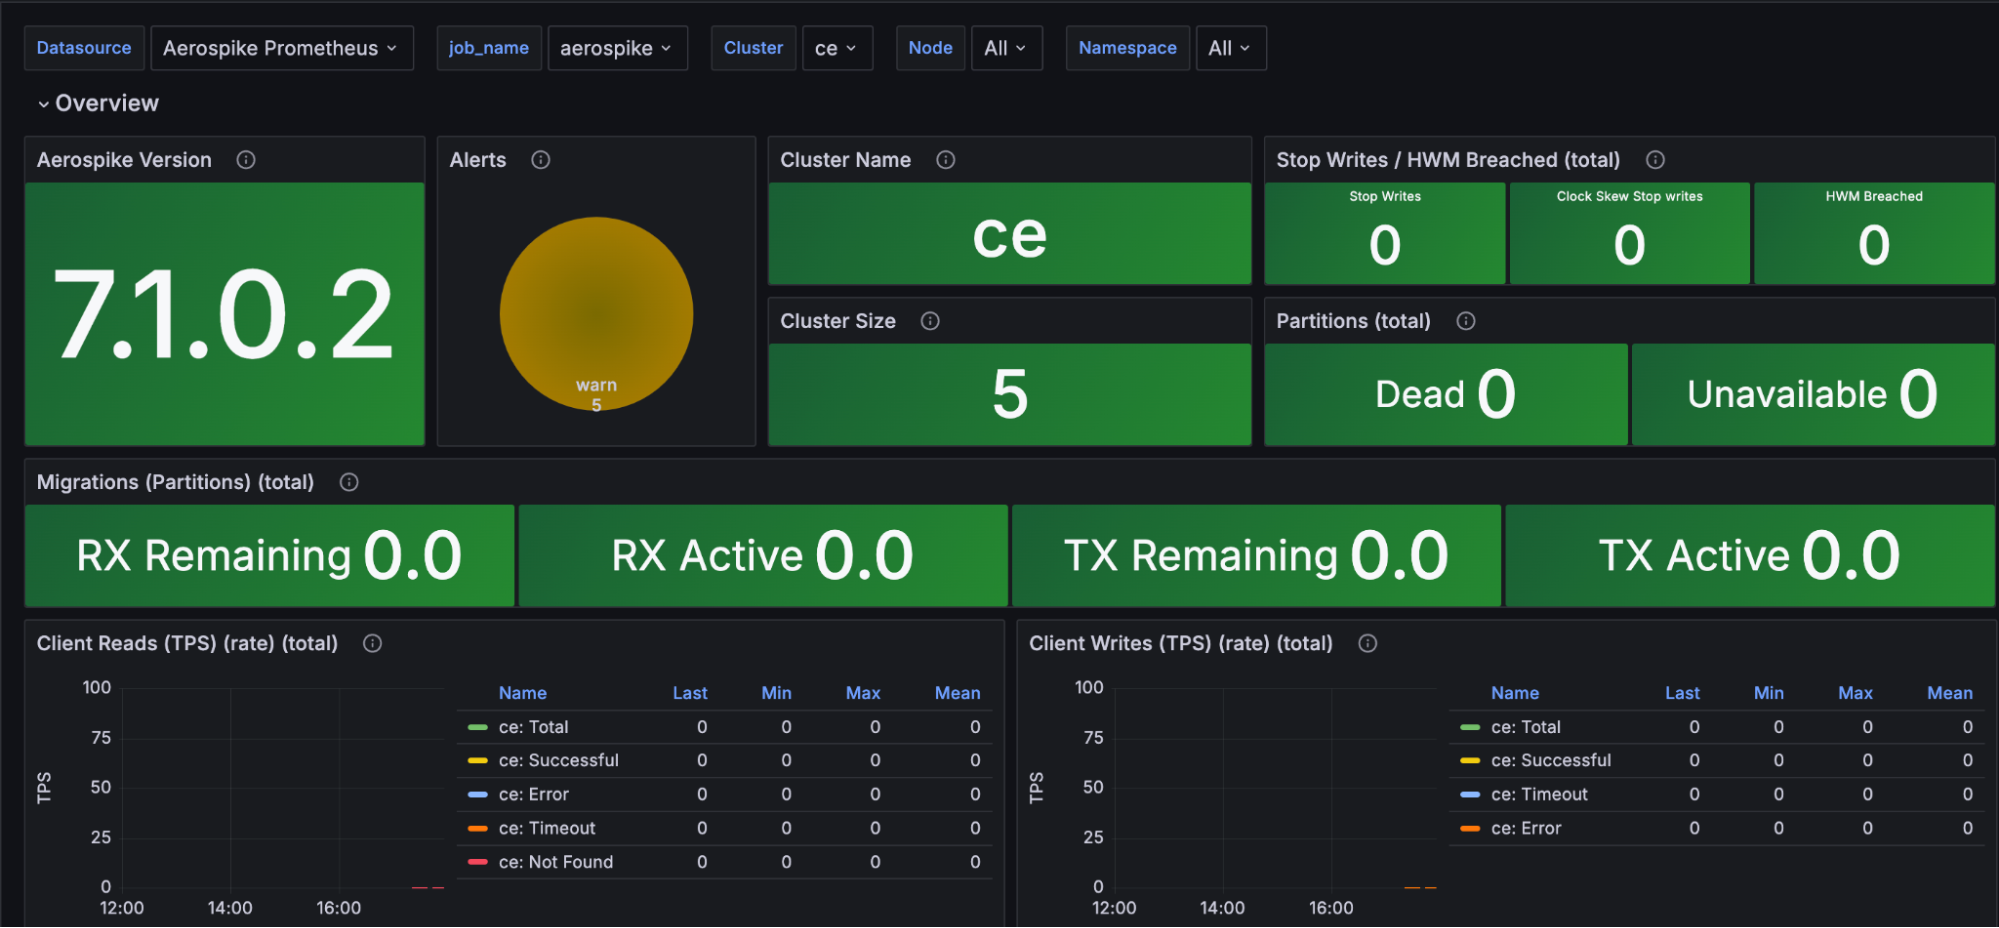
aerolab client create ams -s ceThat’s it! You should now be able to navigate to localhost:3000 in a browser and log onto Grafana with username/password of admin/admin. Then you can navigate to the dashboards and see your cluster, depending on which Aerospike dashboard you select. For example, this is from the Cluster Overview dashboard:
First application
Now that you have a 5-node cluster up and running and it’s monitored, it’s time to write your first application. Here is some sample application code using Java:
package com.timf;

import java.util.Arrays;
import java.util.HashMap;
import java.util.List;
import java.util.Map;
import com.aerospike.client.AerospikeClient;
import com.aerospike.client.Bin;
import com.aerospike.client.Key;
import com.aerospike.client.policy.ClientPolicy;


public class CeBlogExample {
  public static void main(String[] args) {
    ClientPolicy clientPolicy = new ClientPolicy();
    clientPolicy.useServicesAlternate = true;
    try (AerospikeClient client = new AerospikeClient(
                  clientPolicy, "127.0.0.1", 3101)) {

      Map<String, Object> address1 = new HashMap<>();
      address1.put("street", "123 Main St");
      address1.put("city", "Denver");
      address1.put("zip", "80014");

      Map<String, Object> address2 = new HashMap<>();
      address2.put("street", "222 Smith St");
      address2.put("city", "Atlanta");
      address2.put("zip", "30033");

      List<Map<String, Object>> addresses = Arrays.asList(address1, address2);
      for (int i = 0; i < 100_000; i++) {
        Key key = new Key("test", "customer", i);
        long now = System.nanoTime();
        client.put(null, key,
              new Bin("name", "joe-"+i),
              new Bin("age", 28+i),
              new Bin("addresses", addresses)
        );
        System.out.printf("Time: %,dus\n", (System.nanoTime() - now) / 1000);
      }
    }
  }
}
The POM file associated with the application will need to include the Aerospike Java client dependency:
<dependency>
        <groupId>com.aerospike</groupId>
        <artifactId>aerospike-client-jdk8</artifactId>
        <version>8.1.2</version>
</dependency>
This code will insert 100,000 records into the Aerospike Database. This should take a few moments, and each line will print out how long it took to insert the record. (Note that you’re not running on production-quality hardware here, so if your results aren’t amazing don’t feel bad. Still, it would be surprising if the average insert time was greater than a millisecond or so, which is pretty amazing).
The code is fairly simple except for maybe the connection to the cluster:
ClientPolicy clientPolicy = new ClientPolicy();
clientPolicy.useServicesAlternate = true;
try (AerospikeClient client = new AerospikeClient(
                  clientPolicy, "127.0.0.1", 3101)) {
When a new AerospikeClient is created, the ClientPolicy dictates how the connection is established. In this case each of the nodes in the cluster is exposed on localhost using a different port. You can use
aerolab cluster listto see all the exposed ports for the hosts. In my case, this returns something like:

So port 3101 corresponds to the first node in the cluster. A typical Aerospike cluster exposes the nodes on port 3000, but Grafana also listens on port 3000 so AeroLab defaults the ports to start at 3100 instead to avoid a port conflict.
The useServicesAlternate piece is a little more complex. The 5 nodes form a cluster within the container architecture over their PrivateIP addresses. These private IP addresses are not visible to the native host, which is why each node exposes a single port. When the application connects to the first node in the cluster over this exposed port, that node returns the addresses of the other nodes in the cluster. If useServicesAlternate was not specified, the private IP address of each node would be returned, which is useless to the application as they’re not visible. In fact, if you forget to set this parameter the client will throw an exception as it fails to connect to all the hosts.
When useServicesAlternate is specified, instead of returning the private IP address, localhost is returned with the appropriate port, so the application returns IP addresses that make sense to it.
A full explanation of the rest of the code can be found in this video, as well as an explanation of the data model such as what namespaces, sets and bins are.
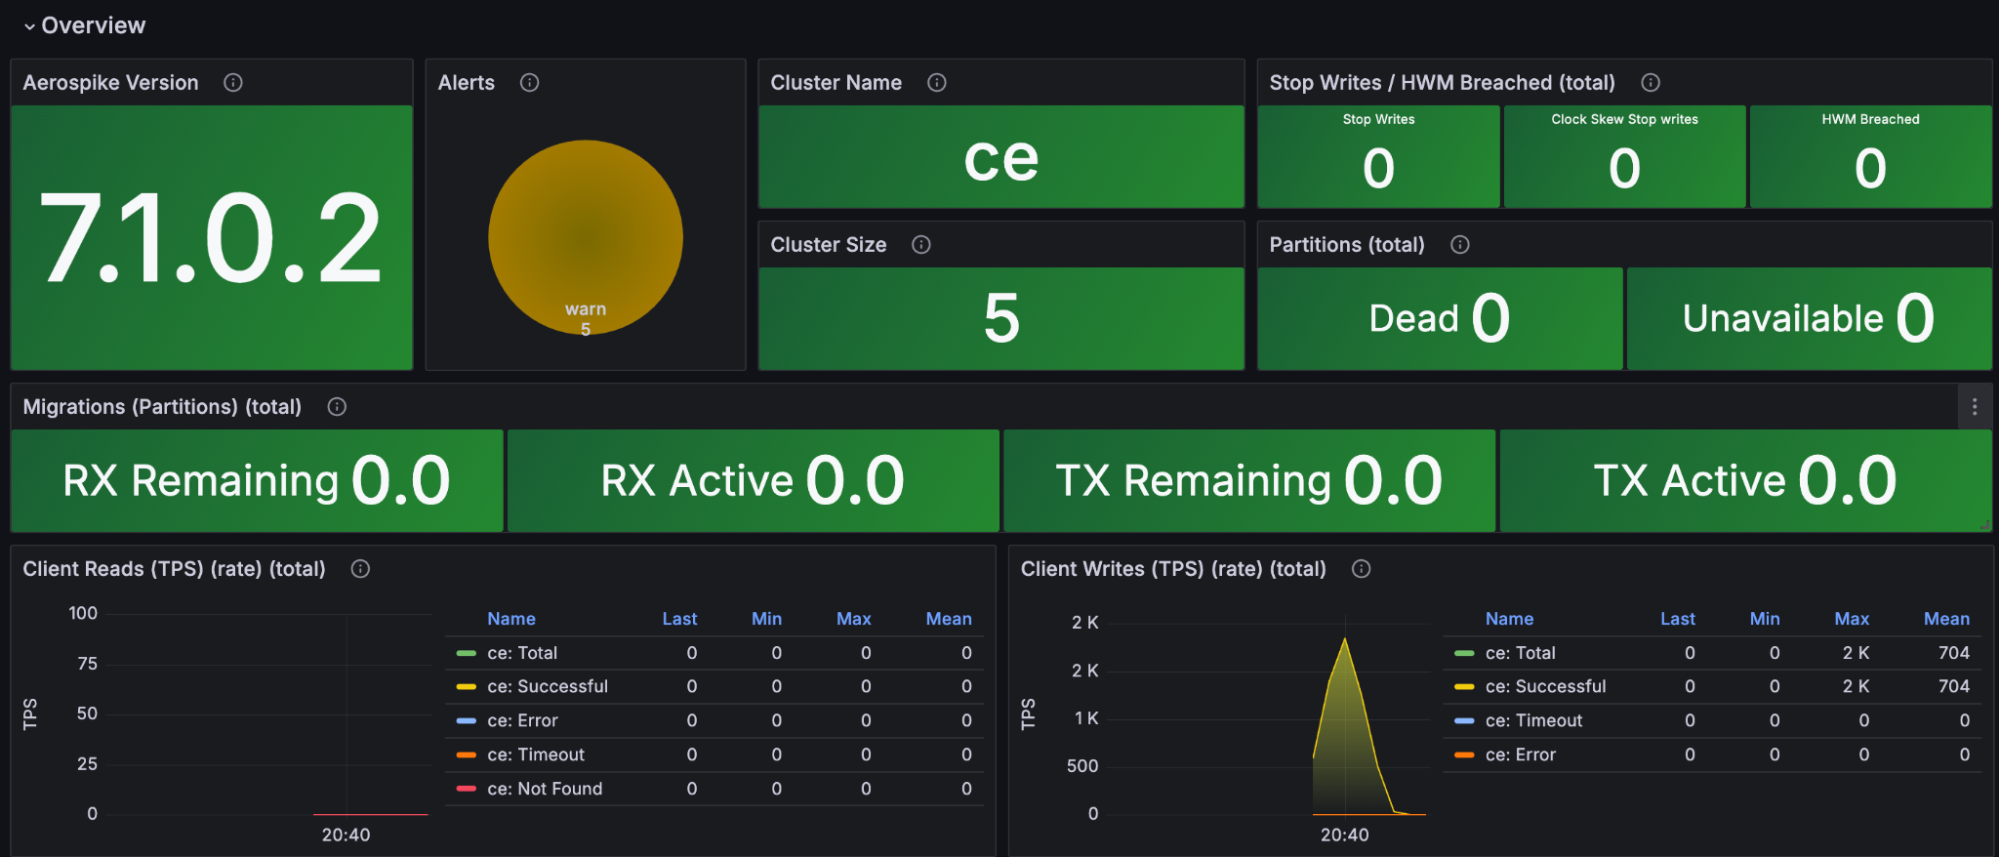
Once the code is run, there should be a blip on the monitoring dashboards showing the activity:
One final touch of AeroLab magic…
Hopefully, by now, you’re excited by the possibilities Aerospike CE along with AeroLab can bring and how quick and easy it is to get started. But what if you didn’t want to install a development environment on your machine to test it out?
Well, fret not! AeroLab (still) has you covered. Go to your command prompt and execute:
aerolab client create vscode -n vscodeLet this command run, and when it completes, open a browser and navigate to port 8080 on localhost. There you will find a fully working version of VSCode, including libraries already set up for the most common Aerospike client libraries. Here’s a small code snippet showing a Python program to save and retrieve a record into Aerospike.
import aerospike

config = {
   'hosts': [
       ( '10.88.0.4', 3101 )
   ],
   'policies' : {
       'timeout': 10000 # milliseconds
   }
}

client = aerospike.client(config)

client.connect()
key = ('test', 'demo', 'foo')
client.put(key, {
   'name': 'John Doe',
   'age' : 32
})

(readKey, metadata, record) = client.get(key)
print("record contents are", record)
print("key components are", key)
print("metadata is", metadata)

client.close()
One thing to notice is that the VSCode instance is running inside a container similar to the database nodes. Hence you cannot connect to it on localhost like you could from the natively hosted program shown in Java above. Instead you have to connect to the container’s private IP, in this case 10.88.0.4. To get the details of the cluster, clients, VSCode instances, and everything else AeroLab has created (including server private IP addresses) you can execute:
aerolab inventory list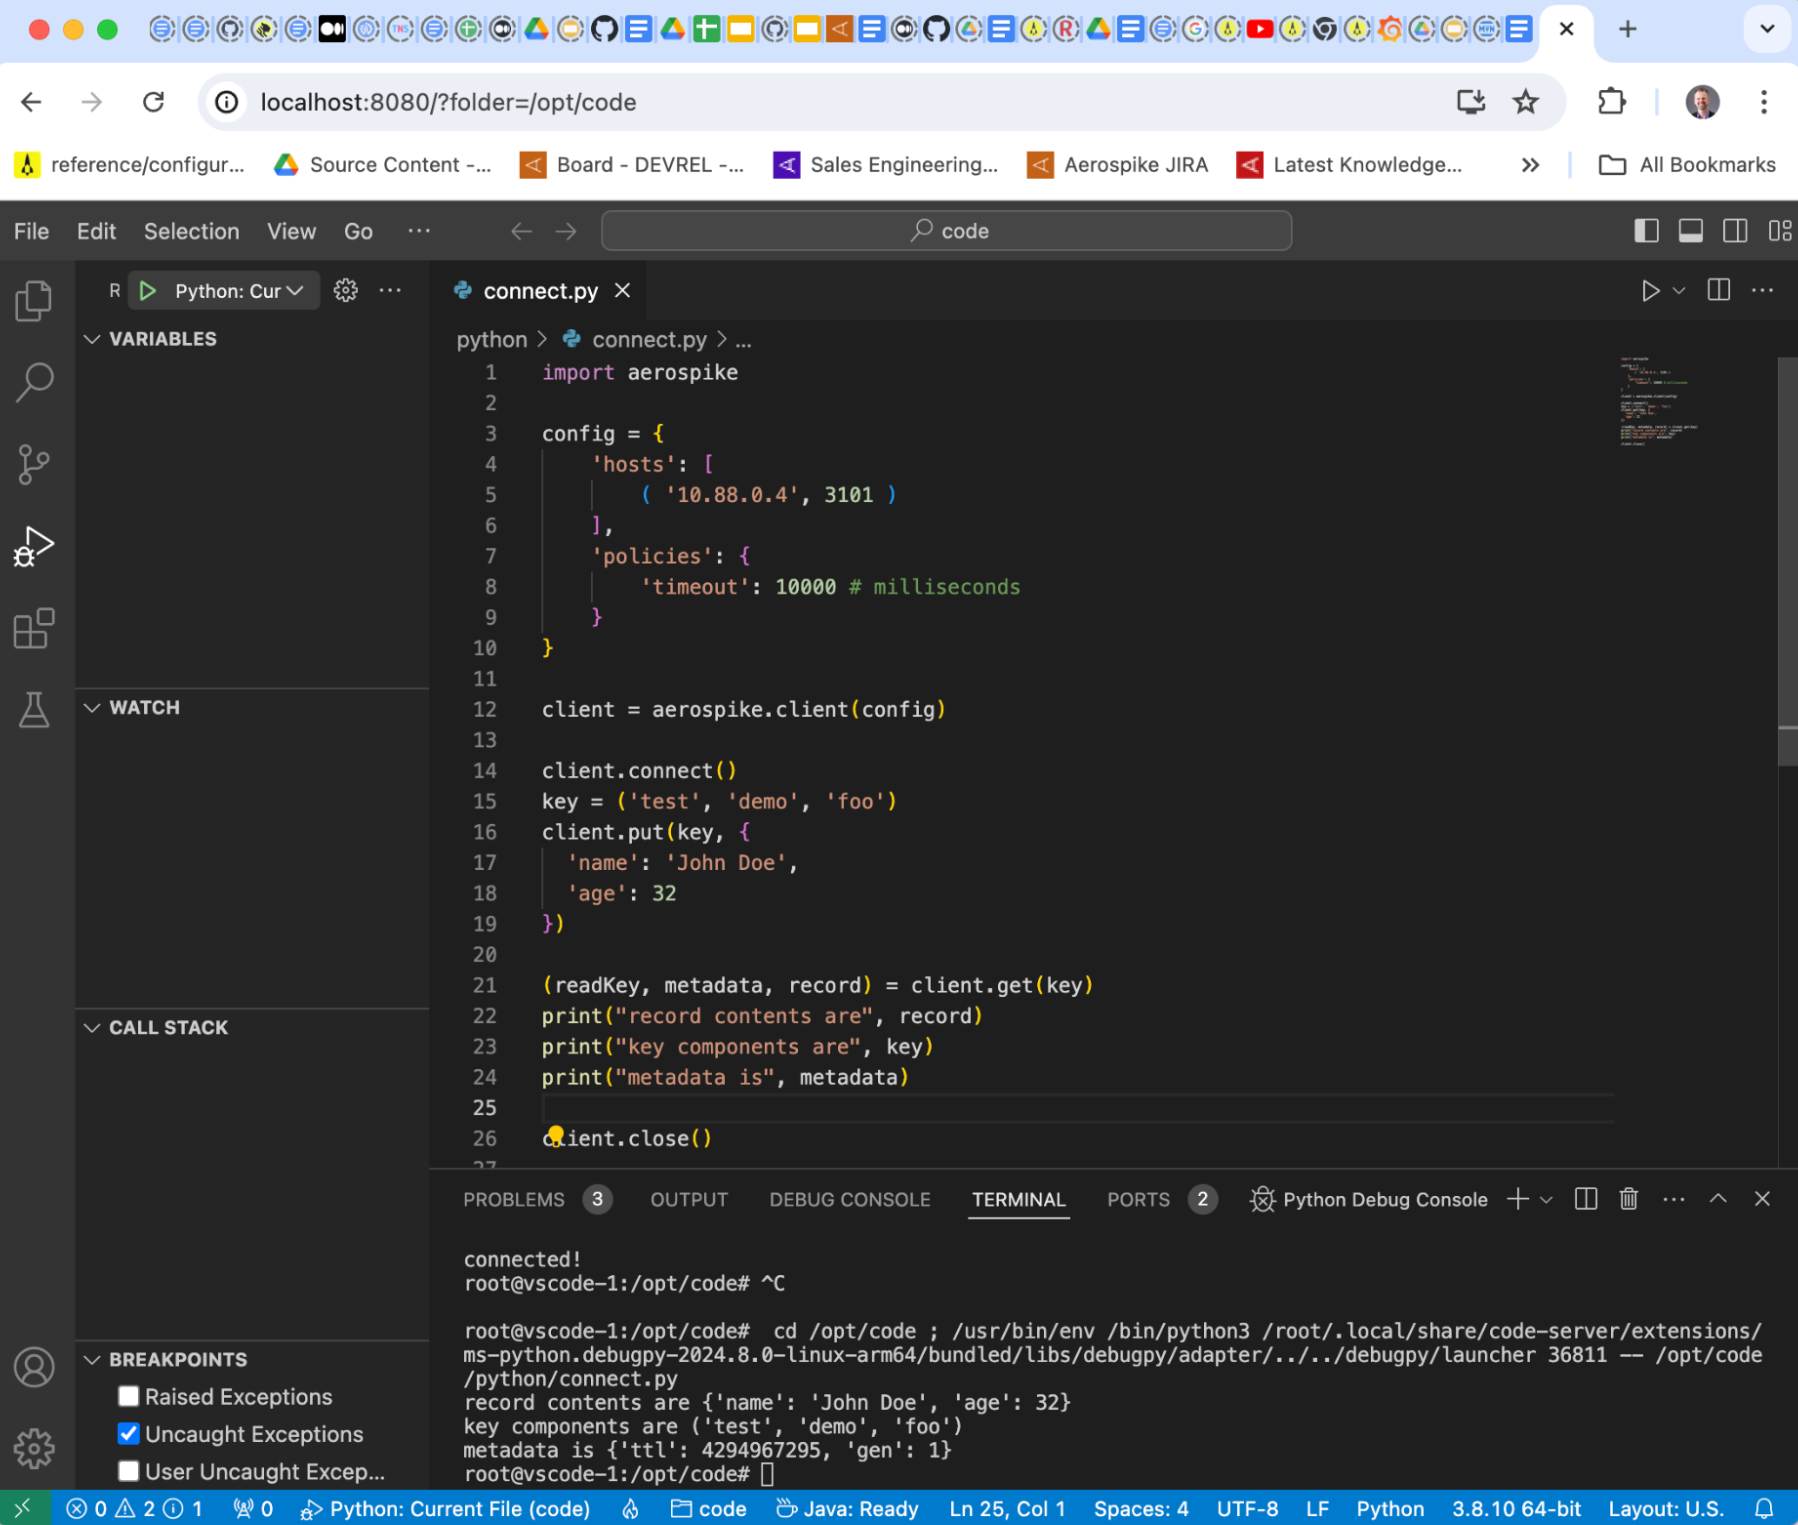
One thing to stress: this blog has focused on using AeroLab with CE in Docker containers. However, AeroLab works exactly the same for the commercial (Enterprise) version of Aerospike, and it can be used to create and manage clusters in either AWS or Google Cloud. This makes it very easy to manage dev, test, staging, etc. clusters in cloud environments. To find out more, take a look at these AeroLab docs which give details and sample scripts of all of its capabilities.
Explore Aerospike CE
Aerospike CE offers a simple yet powerful way to get started with Aerospike. The fact that the storage engine is the same between the open source CE version and the commercial version allows an easy way to test the power of Aerospike. AeroLab is the easiest way to create clusters with Aerospike in non-production situations in containerized environments such as Docker / Podman, AWS or GCP clouds.